...
- Visit the EdgeX Group Calendar within the EdgeX Groups.io instance.
- Scroll to the bottom of the group calendar, select Add Event, and choose the applicable sub-group you are trying to create a new meeting for (such as tsc@lists... or process@lists..., etc.). The sub-groups you belong to will be displayed along with those you have privileges for.
- Fill in the fields for:
- Event Name, enter descriptive name for your meeting.
- Start and End Times, enter the details noting the Timezone, selecting All Day if applicable.
- Event Repeats, select if applicable, and enter the additional details.
- Location, this will be the EdgeX Zoom link (which you will need to have previously set up, see Alternate Meeting Host & Recording Privileges info below).
- You must be very careful to not overlap EdgeX Zoom account meetings, you can view all the meetings within the Akraino EdgeX TSC Group Calendar section of the Wiki.
- Organizer Email, this will be the sub-group mail list (such as tsc@lists... or process@lists..., etc.).
- Organizer Phone, is optional.
- Event Color, this will be the color noted for the EdgeX Zoom account you are using for the meeting (such as EdgeX Edge Stack 1 being purple in group calendar), color designations for each EdgeX Zoom account are available here.
- Description, this will be the relevant meeting details. It is recommend to enter the following:
- Summary of the meeting purpose
- Meeting lead name
- Wiki page for reference
- Full Zoom details
- Request RSVP, select this item to ensure that guests can provide a response to your meeting (Will Attend, Will Not Attend, and Not Sure). This will also allow you to see the responses within the meeting invite.
- Max Number of Attendees, can be left at 0, which means unlimited.
- Note To Send Attendees, is optional (such as a thank you for the RSVP and a pointer to a wiki page for more information).
- Reminders, set this up for automatic email reminders to be sent to the applicable mail list regarding the meetings.
- A 1 day before and 10 minutes before reminder is suggested as a standard, leave as Send As Normal Message.
- Notifications, you must select Send Invite To Group in order for the invite to be sent to the applicable sub-group.
- Leave Send Notice To Group When Event Happens unchecked as it is not a necessary notification in most cases.
- To Update a Meeting, click on the event you are updating and select Edit Event and make the applicable changes.
- Select Update Event to save the changes and ensure you choose the update to reflect on Only This Event or All Meetings as applicable.
- The meeting update will be reflected in the meeting subscription with the next automatic update.
- To Cancel/Delete a Meeting, click on the event you are updating and select Edit Event, scroll to the bottom of the Event and click on Delete Event.
- You'll need to select either Only This Event or All Meetings as applicable here as well.
- The meeting update will be reflected in the meeting subscription with the next automatic update.
- Courtesy Email, as a meeting lead it is a best practice to email the applicable sub-group with a note about any new meetings available, any meeting changes, or meeting cancellations.
...
- Privileges are only granted to TSC Members, Sub-Committee Chairs, PTLs, or Community Coordinators
- You must have and utilize a LastPass account (installing the LastPass extension to your browser after your account is set up)
- You must provide the email address associated with your LastPass account to the Linux Foundation by emailing meeting-requests@lists.akrainoedgexfoundry.org
- Recordings should be saved to the alternate-host's computer rather than to the cloud, see detailed instructions below
- The alternate-host has the responsibility for uploading the recording file to the applicable TSC Meeting Drive, and linking it back to the applicable TSC Wiki page (Note: This is an evolving model and updates will follow with a solution that better accommodates those with Google access issues)
- The alternate-host must review and understand the Zoom Overview and Zoom Bridge Errors information outlined above
All approved alternate-hosts will be added to the meeting-hosts@lists.akrainoedgexfoundry.org mail list for meeting troubleshooting and questions (see above).
...
- Open your LastPass account in your browser, and choose open my vault
- On the left lower part, press the icon with two people
- Choose "Manage Shared Folders" and approve the one from Akrainofrom EdgeX
- The account's login will be add to your LastPass and you will be able to choose from it when logging into into the Akraino Zoom EdgeX Zoom account
Login:
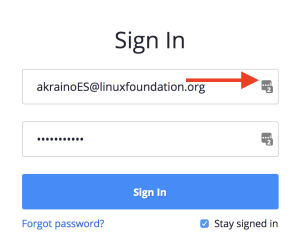
- Go to https://zoom.us/signin to sign in using the LastPass information associated with your Akraino Zoom EdgeX Zoom meeting account, press the marked part to choose from available accounts/passwords:
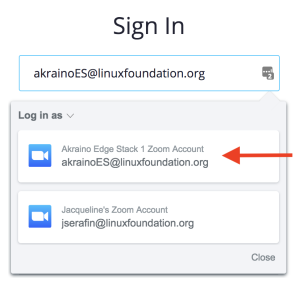
Select the Akraino EdgeX Zoom account corresponding to the meeting you want to record and log in using it, the credentials will auto populate:
- Choose "Meetings" from the menu on the left
- Find your meeting on the list (usually the top one) and click the "Start" button to launch your meeting
- After the meeting has started click the "Record" button located at the bottom of the Zoom window OR if someone is screen sharing the recording option will be found under the "More" section of the Zoom menu bar
- Select "Record to this Computer"
- You can pause and resume if necessary and the recording will be saved as a contiguous stream
- Stop the recording when you are finished, it will be saved to your computer when the meeting is officially ended
Upload the zoom_#.mp4 to the applicable TSC Meeting Drive, and link it back to the applicable TSC Wiki page for your meeting (Note: This is an evolving model and updates will follow with a solution that better accommodates those with Google access issues)
After you have verified the upload was successful and you can watch the recording from the Wiki you can remove the files from your computer
Note: Regarding Chat File Content, uploading the chat.txt file is often beneficial to the team. Be advised the chat file may contain private chats sent from/to the person recording the meeting.
- DO NOT upload any "audio_only" or "playback" files.
...